
How To Update To Ghost 1.0 In Debian And Apache

Edit: In Nov 2022 I discovered that Ghost decided to make its platform more friendly to other OS and platforms such as Debian, so I went back to the platform (after using Wordpress for a while). This post may be somewhat out of date then. You may want to read more about it here.
Initially, when ghost announced its 1.0 release, I was absolutely thrilled. As you may already know, I have been a ghost fan since I heard about the alternative blogging platform.
The update looked promising. New editor with improved functionality, automatic updates, and of course the fact that it was the first non-beta release.
However, when I visited the Ghost install website, I was shocked to find that ghost 1.0 required not only a concrete web server (Nginx), but also a concrete operating system too (Ubuntu):
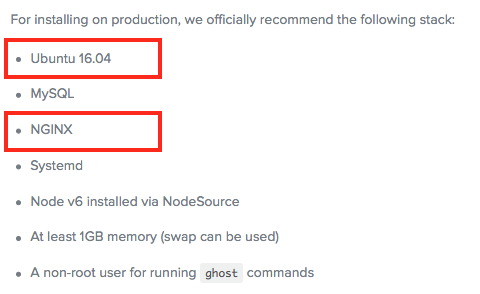
While I have worked with Ubuntu and Nginx in the past, and I love both, the server where I have my blog hosted happens to run on Debian + Apache2.
However, being brother Linux distros, I thought that probably those were just mere recommendations. After all, a blog running on a web server should be system agnostic, shouldn’t it? If wordpress can run on a Windows machine, the next generation of open source blogs can certainly run on a Debian box, right?
The “Not So Open” Blogging Platform
Being a major release update, you can’t update to Ghost 1.X directly. You need to create a new install and import the previously exported data from your old one. As it turns out, the installation via the ghost-cli expects you to have that exact Ubuntu+Nginx environment. Otherwise, it fails.
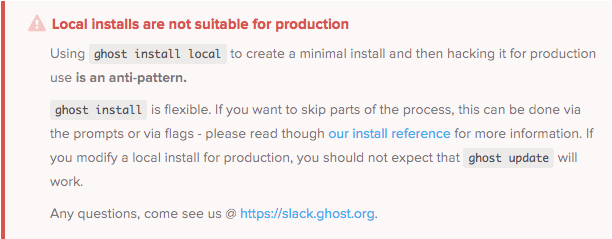
There are two types of installations available, the “production install” and the “local install”. Supposedly, if you have a different environment, you should opt for the latter. However, the Ghost team makes it clear that a local install is not suitable for production.
Thus, the only chance for us, non-Ubuntu users is going for the production install and trying to fix things. Let’s see how to do this for Debian Jessie (8.9) and Apache 2.4.
Installing Ghost Via The CLI Interface.
If you are updating your Ghost installation from Ghost 0.11.X, I suppose you already have node, a ghost user and the ghost-cli package installed. If not, follow the first steps of the installation guide.
Preparing the MySQL Database
After that, you need to install and configure MySQL. Ghost 0.11.X used SQLite3 by default, so you probably haven’t setup MySQL yet. First, install the required packages as root.
# aptitude install mysql-server
Then, initialize and secure your installation:
# mysql_secure_installation
Finally, login into MySQL and create the database, user and proper permissions for the ghost user:
# mysql -u root -p
(insert password here)
mysql> create database yourblogname;
mysql> CREATE USER 'yourbloguser'@'localhost' IDENTIFIED BY 'yourpassword';
mysql> grant create,delete,insert,select,update,alter ON yourblogname.* TO 'yourbloguser'@'localhost';
mysql> flush privileges;
Launching the Ghost Install Process
Next, we can create a directory and call ghost-cli to start the installation process:
# mkdir /var/www/html/yourghostblog
# chown ghost:ghost /var/www/html/yourghostblog
# cd /var/www/html/yourghostblog
# ghost install
You will be greeted with a beautiful “you are about to destroy the world” warning message:
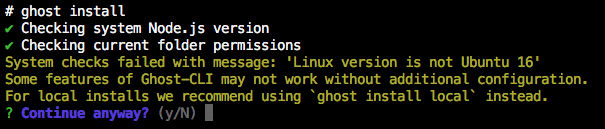
Type “Yes” anyway. We Debian users love danger, don’t we?
Initial Configuration Questions
Then, you will be asked some questions about your setup.
? Enter your blog URL: http://yourblogname.com
? Enter your MySQL hostname: localhost
? Enter your MySQL username: yourbloguser
? Enter your MySQL password (skip to keep current password): [hidden]
? Enter your Ghost database name: yourblogname
Next, it will ask you specific questions about the installation. Here is where the limitations of the new Ghost release come to the fore. You should answer this:
? Do you wish to setup Nginx? No
i Setting up Nginx [skipped]
Task ssl depends on the 'nginx' stage, which was skipped.
i Setting up SSL [skipped]
Great, so no Nginx means no SSL configuration, of course. Next, it asks you about MySQL.
? Do you wish to setup "ghost" MySQL user? Yes
MySQL user is not root, skipping additional user setup
i Setting up "ghost" mysql user [skipped]
Errr… well, thanks for that. Next, Systemd.
Do you wish to setup Systemd? Yes
✓ Creating Systemd service file at /var/www/html/yourblogname/system/files/ghost_yourblogname-com.service
Running sudo command: ln -sf /var/www/html/yourblogname/system/files/ghost_yourblogname-com.service /lib/systemd/system/ghost_yourblogname-com.service
✓ Setting up Systemd
As you can see, the installation incorrectly creates a symbolic link on /lib/systemd/system/, when it should go into /etc/systemd/system. This means that your ghost blog won’t launch on a system reboot.
Finishing the Installation
Finally, the installation process asks you to start ghost, but don’t hold your breath, it will throw an error:
? Do you want to start Ghost? Yes
✓ Validating config
✓ Starting ghost
x Starting ghost
A ProcessError occurred
Error occurring running command '/bin/sh -c sudo systemctl enable ghost_yourblogname-com --quiet
Exit code: 1
Obviously, the file cannot be found because it’s not in the right place.
However, you should be able to start the Ghost installation manually by running a ghost run on the blog directory. Try it now and navigate to that URL in your browser. You should be able to reach the blog, yay!
Making Sure Ghost Keeps On Running
In order to keep Ghost alive in our Debian boxes, we need to copy the file, or create a new one in /etc/systemd/system. I created one called /etc/systemd/system/ghost.service, with this content.
[Unit]
Description=Ghost systemd service for blog: yourblogname
Documentation=https://docs.ghost.org

[Service]
Type=simple
WorkingDirectory=/var/www/html/yourblogname
User=1001
Environment="NODE_ENV=production"
ExecStart=/usr/bin/nodejs /usr/bin/ghost run
Restart=always

[Install]
WantedBy=multi-user.target
The installation guide instructs you to run ghost start and ghost stop to start and stop the ghost instance respectively. However, those commands won’t run, they will throw an error.
/usr/lib/node_modules/ghost-cli/node_modules/yargs/yargs.js:1079
      else throw err
           ^

Error: unknown
at module.exports.sync (/usr/lib/node_modules/ghost-cli/node_modules/execa/index.js:298:26)
at handleShell (/usr/lib/node_modules/ghost-cli/node_modules/execa/index.js:100:9)
Apparently, the only command that runs is /usr/bin/ghost run, that will create a new instance of Ghost directly.
The best way to test that it’s working is rebooting your server. Upon start, you should be able to see the node instance on port 2368, and navigate to your blog in a browser.
Proxy Redirection For Apache
If you were running Ghost previously, I assume you already had a proxy in place to redirect apache requests to your Ghost port. If not, you just need to setup an entry in /etc/apache2/sites-available/ with this content:
<VirtualHost *:80>
    # Domain name
    ServerName yourblogname.com
    ServerAlias www.yourblogname.com

    #HTTP proxy/gateway server
    ProxyRequests off
    ProxyPass / http://127.0.0.1:2368/
    ProxyPassReverse / http:/127.0.0.1:2368/
</VirtualHost>
Additionally, you may want to add an HTTPS entry to port 443 with your certificates.
No, You Won’t Be Able To Update Ghost
Unfortunately, the fact that ghost commands are broken means that you cannot run the command that’s supposed to update your Ghost installation:
ghost update
This command will throw the exact same error that ghost start or ghost stop. This is certainly a big deal breaker, because you won’t be able to update your ghost installation anymore.
Unfortunately, the Ghost team has decided that they won’t be offering support to anyone without Ubuntu+Nginx. I really hope they will change their minds, because otherwise I really need to consider going back to WordPress again. Yes, it’s slow and clumsy, but I can update it by just clicking a button.
Update Your Theme And Import Your Content Back
Once you have the installation ready, and you are certain that it will survive a system reboot, you need to update your theme. Fortunately, the guys at Ghost put together a page where you can check if your theme is ready for the new version. If the author of your theme hasn’t already updated it to Ghost 1.0, there’s also a page with detailed instructions on how to update the theme yourself.
Luckily for me, the author of the Boo theme updated it for the new release. I don’t know if I would like to go through the process of manually updating it myself.
Finally, you should update your content back. This is as simple as coping the contents of the /content/images folder from your old installation, and using the Import Content feature of the “Labs” section of the admin interface.
In Summary
The Ghost team decided to limit the first big release of Ghost to just Ubuntu and Nginx users. That is a huge step backward and an unfortunate decision in my humble opinion.
Having installed and worked with Ghost 0.11.X happily in my Debian+Apache2 box in the past, I cannot understand why they decided to implement such an opinionated installation mechanism. Nowadays, it’s certainly not that hard to implement a universal installer for most Linux distributions.
With this decision, they are neglecting a large number of users, including me.
As a result, I wrote this post to share with you how to update to Ghost 1.0 in Debian and Apache. I hope it can be helpful even for other Linux distributions like Mint or CentOS.
However, the process is inherently broken, as you won’t be able to properly update your Ghost installation ever. Thus, I recomend you to wait and share your discomfort with the guys at Ghost, hoping that they will change their minds and implement a more universal installer for us, Linux and MacOS users.
Nevertheless, if you have found a way of making the whole installation process work correctly, including ghost start, ghost stop and ghost update, please let me know.


Comments ()