Working on an iPad Pro for Bloggers
From the moment I bought my iPad pro, I fell in love with it.
At first, I thought it would be just another iPad with a faster processor and an attached keyboard.
However, I discovered that the iPad Pro is a performance beast and wondered if it may replace your laptop if you are a blogger, writer, developer, or even designer.
In this “Working on an iPad Pro” series, I want to explore the possibility of using the iPad Pro as your only work tool in different scenarios.
Embracing the iPad Work Lifestyle
There’s something absolutely fascinating about the iPad Pro for me. Apart from a blogger, I am a developer, writer, musician, and entrepreneur, so I use it for quite a diverse number of things.
I have the smart keyboard and I find it really comfortable for typing, even for long periods of time. Also, it works surprisingly well not just for casual writing, but for coding too.
The fact that you can carry it in your hand and that it is so lightweight makes it also a winner for digital nomads.
Thus, as soon as I started to use mine, the unavoidable question came to my mind: can you work on an iPad Pro and get rid of your laptop completely?
As this question can be answered from so many points of view (blogger, designer, developer, entrepreneur, podcaster, musician…), I’ve decided to devote a post to each of them.
This first post discusses working on an iPad Pro for Bloggers. Let’s go!
Working on an iPad Pro for Bloggers
In order to be able to work as a blogger, you need at least the following:
- Access to an application or a web interface that will allow you to add and edit posts. This is obviously a must.
- The ability to capture, edit, and add images to your posts. Optionally, working with video too.
- Access to third party applications that are important for the professional blogger, such as your newsletter or social media management tools.
First, let me talk about the different blogging platforms, and the tools they offer to work on your blog on an iPad Pro.
Blogging Platforms
There is a myriad of platforms where you can start your blog. Some of them offer a whole blogging experience through a website or web application (blogging-as-a-service), while others require you to host your own blog in a server.
I like to have control over my blogs, so I have always gone the self-hosted route. If you really want to blog professionally, you may eventually need to be the owner of your blog too. However, many bloggers prefer blogging-as-service alternatives such as Medium.
Web platforms
There are different platforms where you can launch your blog without any technical knowledge or the need to configure your own server. Unfortunately, most of them are ugly, ancient, and inflexible (such as Blogger), still in its infancy, or too limited to be interesting.
Thus, I would dare to say the only two professional options out there are WordPress and Medium.
Take into account that these platforms are not NGOs. They monetize their work either by pay-per-month plans (such as WordPress) or through ads or freemium models (like Medium).
The advantage is clear. Everything happens on the browser, so you can work with these platforms from your iPad Pro right away. They are fully responsive. Of course, blogging is not just putting words on a page. There are important considerations that still apply, such as image manipulation, that I address later in this article.
Self-Hosting Your Blog
Fortunately, I am a proficient developer and IT geek, so I know how to manage a VPS (self-hosted virtual private server). I use Linode. They have great machines for affordable prices, and you can have your dedicated server for your blog up and running for $5 a month.
If you have the technical knowledge and can afford it, I would recommend that you use a dedicated, serious VPS and stay away from shared hosting providers such as Hostgator, Bluehost, and the like.
So to get your server up and running, you need to enter “Matrix” mode and have access to the console of your server, right? No problem. There are some excellent terminal apps for iPad. I can recommend you Prompt for iPad. It’s not cheap, but it works beautifully. There is also Blink, which includes a mosh client. If all that is starting to sound like technical gibberish in your ears, don’t worry, I will stop here . Otherwise, you can read more on my “Working on an iPad Pro for Developers” article.
If you know nothing about servers, dark screens with typewriter-like characters, and all that stuff, but still want the most professional option for your blog, my suggestion: hire an IT guy to help you.
We have several options for self-hosted blogs. By far, the most popular and widely used is WordPress. There are other alternatives, but all of them have an important “but”:
- Some of them, such as Jekyll, are targeted at a super geeky market and not suitable for a general audience (i.e: a travel blog, a photographer’s portfolio blog…).
- Others are very limited in scope and require a custom platform setup that is not easy to set up or maintain. Ghost, in particular, is a pitiful example of this, as I tried and loved the platform, but had to abandon using it due to the absurd platform limitations.
So TL;DR: stick to WordPress, unless you are a real pro geek and want to use a different platform. Thus, I will give you a glance at how it is to blog on WordPress using the iPad Pro before moving on to other considerations (images, social media, etc).
WordPress
I have worked for years with WordPress. It’s a great blogging platform, and one of the most popular and widely used ones around the globe. If you have little or no technical knowledge, WordPress is a perfect choice for you.
It’s easy to install and, once it’s up and running, can be completely managed from a –somewhat dated– visual user interface. It has also a rich set of plugins, both paid and free, that can add to your website any kind functionality you might ever need, from newsletter opt-in forms to image sliders and everything in-between.
However, WordPress has some disadvantages you must be aware of.
Generally speaking, WordPress blogs are slow and clumsy when compared to other blogging platforms. The more plugins you add, the slower your site will load. And you will require at least some plugins to adapt your blog to your needs. Additionally, some plugins might present conflicts with some other plugins and cause problems on your website. So you need to be careful with which plugins you install and enable on your site.
Also, the technology used by WordPress (PHP/MySQL), the fact that it’s the most widely used blogging platform, and the plugins (that come from diverse developers that may maintain them or not) make WordPress a target for all kinds of malware. Vulnerabilities appear frequently, both on WordPress itself and on many plugins, and you should make sure to update them all regularly.
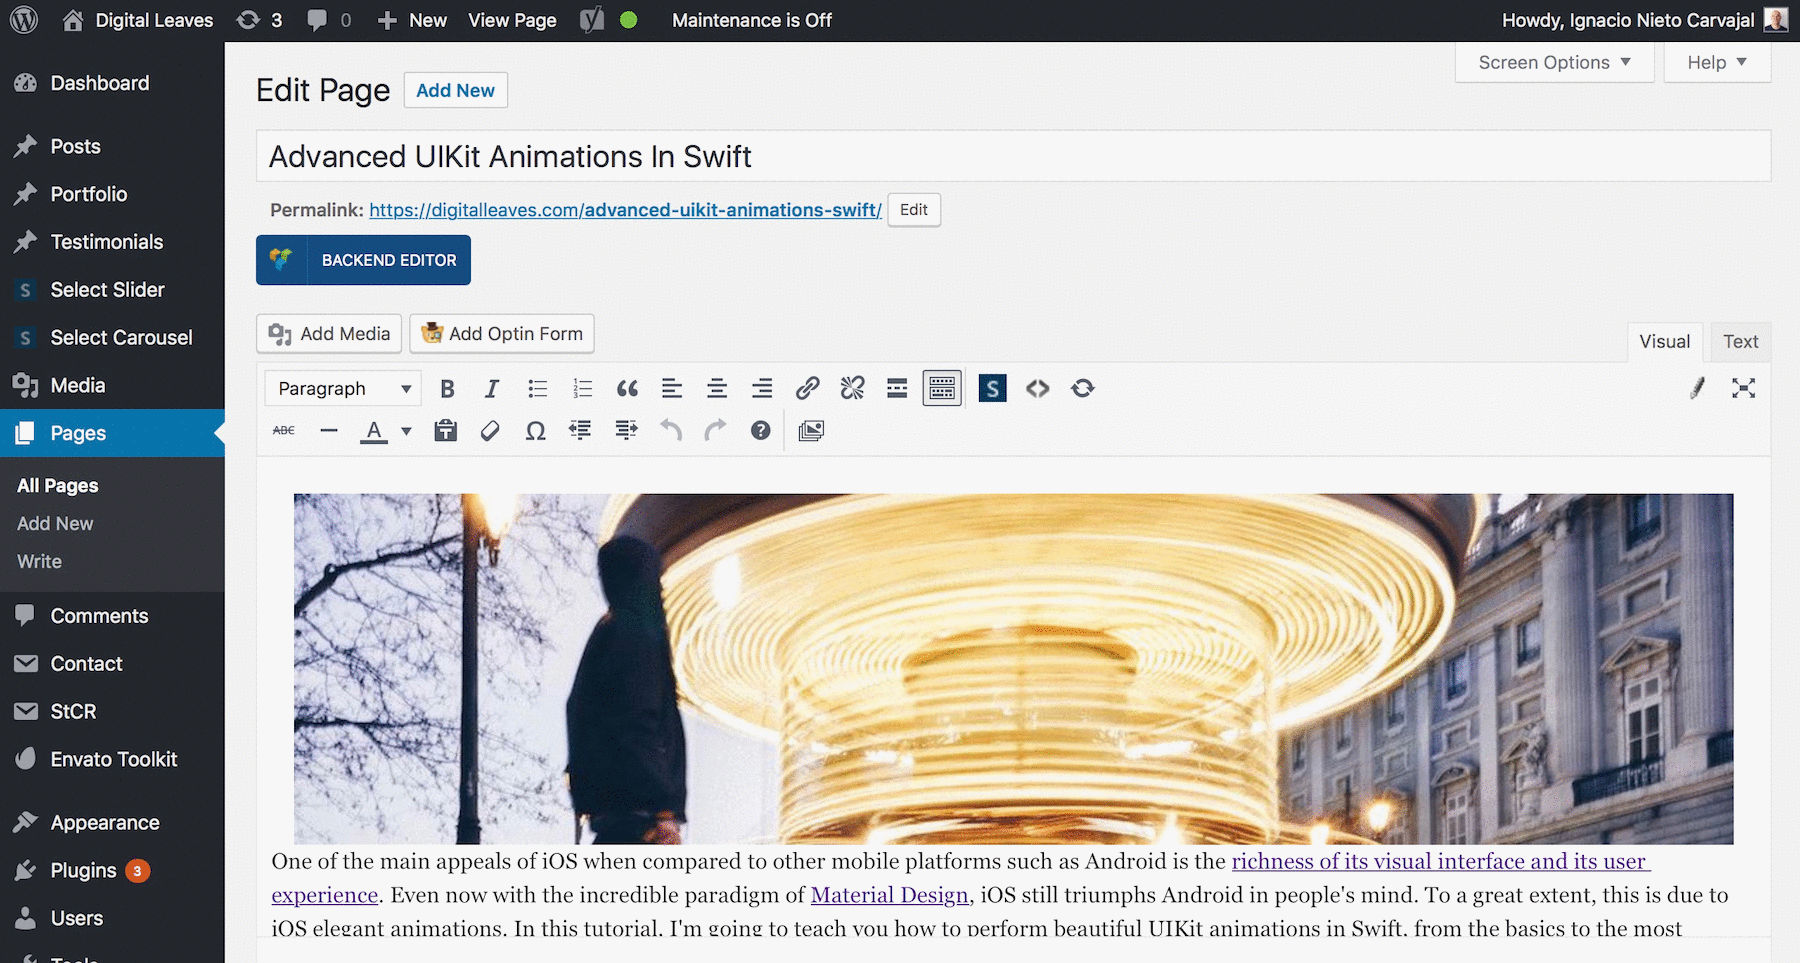
Ok, so now that you know the pros and cons of WordPress, how easy or not it is to blog on an iPad Pro using WordPress? Until recently, it was next to impossible. However, WordPress updated its App recently, including some changes that make it possible to actually blog on it using an iPad Pro.
You have two options for writing and editing your posts in your WordPress blog: the web interface and the native iOS app.
The web interface
The WordPress web interface works great on your laptop. It is relatively clean and flexible, you have all the options you might need to format and style your post, and also all the advanced functionality from plugins (like SEO, categories, the visual composers…).
However, this interface works terribly bad on an iPad Pro, to the point of being almost unusable. As an example, if you try to move up or down, left or right inside the post using the arrow keys, the interface will jump to the bottom of the screen, outside of the editing window.
They are adding improvements slowly, but there is still a long way to responsiveness for WordPress. Take into account that is an interface that started in 2003. Smartphones didn’t even exist back then.
The iOS App
WordPress has an iOS App too. I have to admit that the App has a nice and clean interface. Minimalist even, I would say.
Up until just some weeks ago, the formatting options of the iOS App were very limited. It was not really usable for a professional, serious blog. Something as essential as adding a heading was not available. However, WordPress introduced the new beta editor, which includes a lot more formatting options, including, yes, headings.
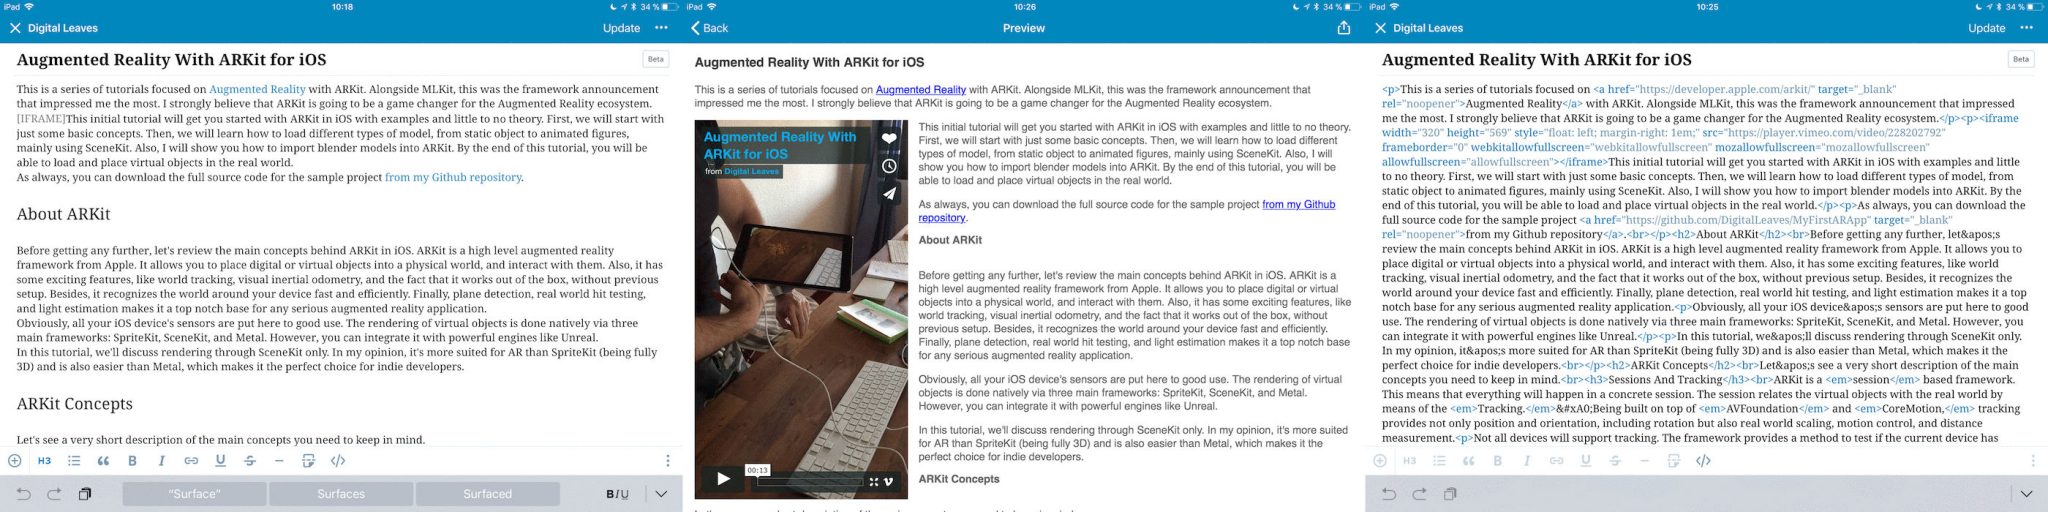
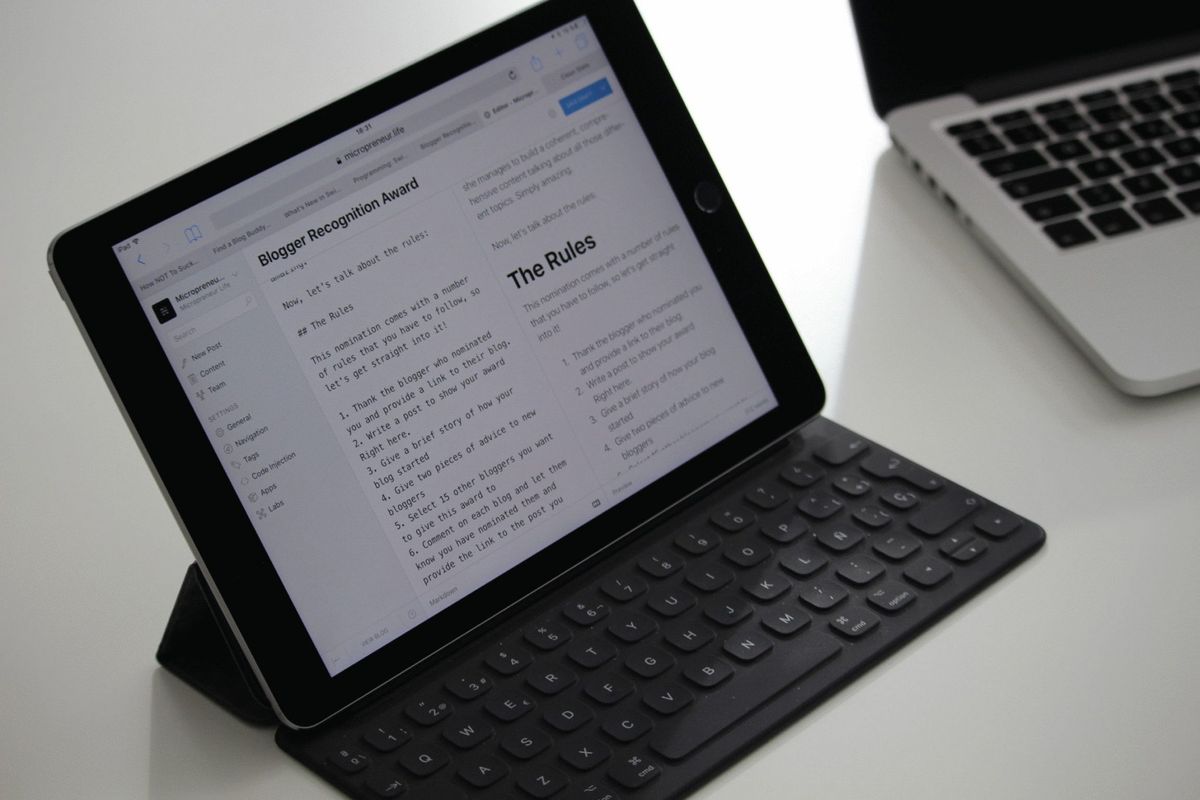
While the new editor makes the experience of editing a post on your iPad almost as good as on your laptop, it’s not quite there yet. As an example, have a look at the image above. You can see one of my posts about Augmented Reality with ARKit for iOS. On the left, you can see the main editor view. Halfway through the first paragraph, I included a video from Vimeo. It appears as “[IFRAME]“. In the middle, you can see the Preview mode, with the video displaying correctly. While in the web interface you will see the video directly just by copying and pasting its URL, in the iPad interface you need to go to the source code view (on the right) to insert or modify it.
Not a major problem for me, but can be a deal-breaker for people without a technical background.
Of course, the iPad interface also misses all the functionality provided by the plugins. It just works as a post editor. As an example, I use Yoast SEO quite regularly and enjoy being able to check some things while I’m writing my posts. With the iPad interface that’s not possible at all.
Third-Party Apps
There is also the possibility to use third-party apps. I concretely use iAWriter for writing, both for the book that I am finishing right now and for my blog posts.
iAWriter allows you to elaborate your posts in Markdown and then export them directly to WordPress by means of a plugin called Jetpack that you have to install in your WordPress blog.

What is Markdown, and why it’s so awesome?
Markdown is a plain text formatting syntax that allows you to write documents directly on text, but using some tags and symbols to apply some format to your document. As an example, in the image above you can see the text on the left side and how it translates to a visual document representation on the right side. The real power of markdown is being able to focus on what you are writing, ignoring all the formatting and visual appearance considerations. You just add your tags, and keep on writing.
I talk about iAWriter in-depth in this post. The main idea, however, is that there are options apart from the official WordPress apps.
In summary, while you can use your iPad Pro to blog using the WordPress platform, it’s still far from a perfect experience, so I can’t affirm that you can replace your laptop completely with your iPad Pro.
Not only writing…
As you know, if you are a blogger, writing is not everything. There are many things that are just as important as the words within a post. Some of them include images and other media, social links, etc. Let’s talk about them next.
Editing Images
One important aspect of blogging is the images and visual elements of your blog.
Images were a bit tricky for me at first. The iPad photo editing tool doesn’t allow you to crop or resize to specific dimensions. Thus, finding a good tool for editing the photos was my first challenge.
Cropping And Resizing
After some research, and trying some free and paid tools, I settled down with Crop Size.
Its interface is ugly, and they could improve its usability a lot, but generally speaking, it allows you to control the size of the images, by finely cropping and resizing them to the pixel.
Additionally, you can perform other editing operations on the images like rotating them or altering their brightness or contrast.
Compressing Images
In order to compress your images (and you are compressing the images of your blog, right?) there are many online tools available.
I use either TinyPNG or CompressPNG. They both work flawlessly with the iPad Pro, and their compression ratio is pretty good.
The Whole Process
The main problem of using the iPad Pro for blogging is how slow and time-consuming is something as simple as adding an image to the blog. As you probably know, you can’t just drop the image. It needs to have the right size, and sometimes tweaks are needed to improve certain aspects of the images. But first, you need the image to be on your iPad. So the usual problems are:
- If you have the images in a device such as an Android phone, you need to figure out a way of taking them to the iPad. Bluetooth doesn’t work, so you will need to use an external cloud service such as Dropbox or Google Cloud.
- The images need to be resized. Something as simple as picking up an image from a folder and using preview to change the image size on a MacBook can be a nightmare on an iPad.
- You need an external app for editing the images and they usually are not very flexible.
- The whole process generates a lot of “intermediate” images that clutter your device.
This is how it works. I have a shared album (on Google Cloud) where I upload all the pics I take from my camera, iPhone, or iPad. Then, I use CropSize to resize and crop them to the exact width and height that I need.
Next, I compress the images by using one of the previously mentioned online tools. Usually TinyPNG. This requires you to split the screen in two apps, with the Images app on the right side and the browser on the left side, drag and drop the images… and it is all very slow and inconvenient because of the fact that iPadOS is not a proper Operating System with a proper file system.
Finally, you upload the image to WordPress and add it to the post.
Video
Unless you need high-quality video editing, you should be fine working with video as a blogger on an iPad Pro.
You have free awesome tools like iMovie available to you, and you can use the iPad to record, edit, and upload your videos to Youtube or Vimeo.
Other Tools
If you are serious about your blog, you certainly need some extra tools to take care of tasks such as managing your newsletter or your social media presence.
Newsletter Management Tools
Given that most newsletter management tools are web-based, you should have no problem using them from your iPad Pro. I have no experience in AWeber or ConvertKit because I use exclusively MailChimp.
For this blog, I create all my campaigns from my iPad Pro. I did the initial design on my MacBook Pro, yes, but I uploaded it as a template and I modify it from the web interface for all subsequent campaigns.
There are certainly many awesome templates I might have used from MailChimp, so I would say that working on an iPad Pro for bloggers, as long as newsletter management is considered, is perfectly doable.
Forget about the MailChimp iOS App. It’s great for checking your campaigns and getting the reports, but it won’t let you do any of the useful stuff. Use the web interface instead.
Social Media Management Tools
Both Hootsuite and Buffer have pretty usable iPad applications, and in the case of Buffer, their web interface works beautifully on an iPad Pro too.
Thus, social media management tools should pose no problem for a full iPad Working Lifestyle.
Other Tools
There are myriads of other useful online tools for bloggers that you can use to make your work easier. Take Canva, for example. It can really help you generate awesome visuals for your posts with little effort.
The Verdict
Is it possible to completely replace your laptop with an iPad Pro if you are a blogger?
Unfortunately, I think the answer is no.
The problem is not that you cannot do things. You can, but veeeeeeeery slowly. Writing a serious blog post on an iPad Pro takes twice the time it would take on a computer.
So unless Apple decides to ship the iPad Pro with a real Operating System, it is simply still not a good replacement for your old laptop.


Comments ()